Manuals
The following text are hyperlinks to. Click on them to get redirected to the websites.
Apps
App Binding
To set up the app, you can either download it from the provided links or search for it directly by the name “Unitree Go” on the App Store or Play Store.
Once you have downloaded the app, please follow these steps:
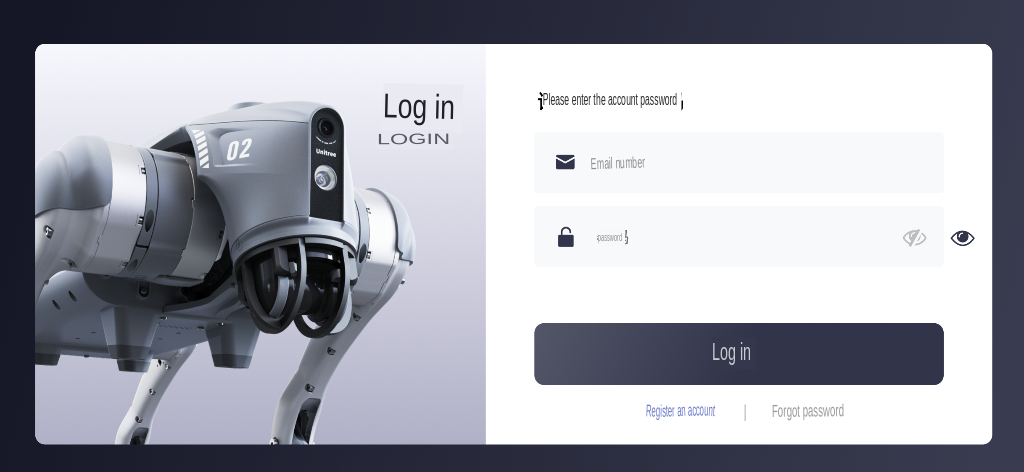
Download and open the Unitree Go App. Register an account using your email address on the login page of the home screen and log in.
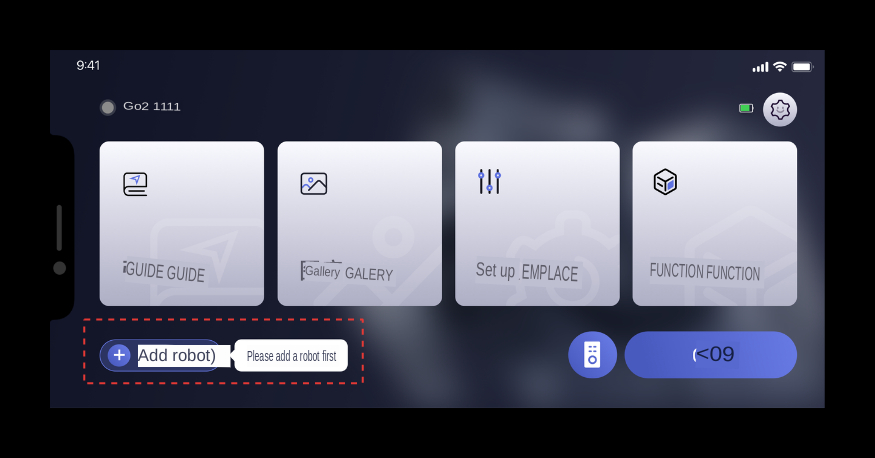
Click on the home page to add a robot.
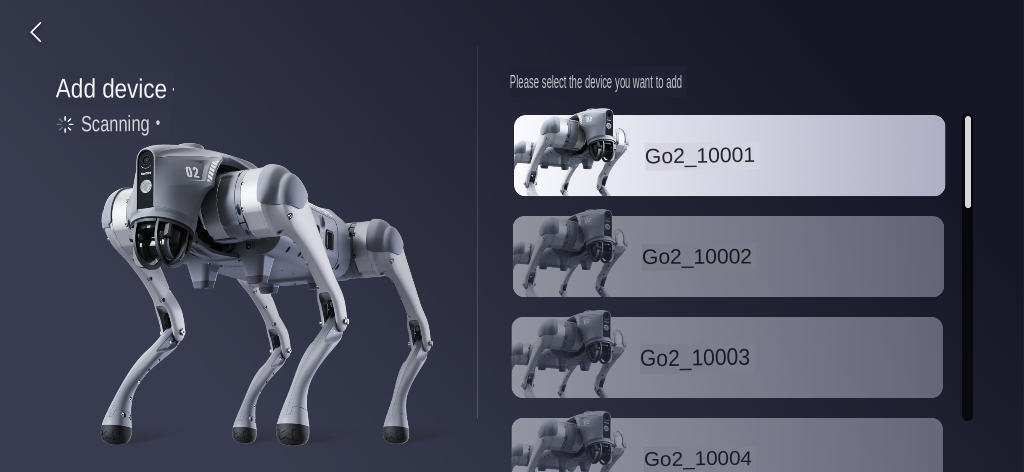
Then, turn on the power of Go2 and simultaneously enable the Bluetooth on your mobile phone. Select the device you want to add for binding.
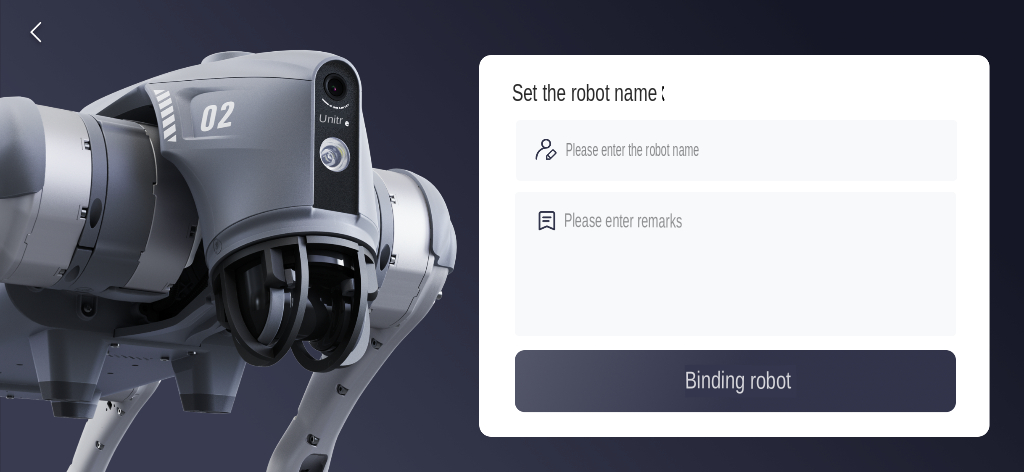
Customize the robot’s information as per your preferences.
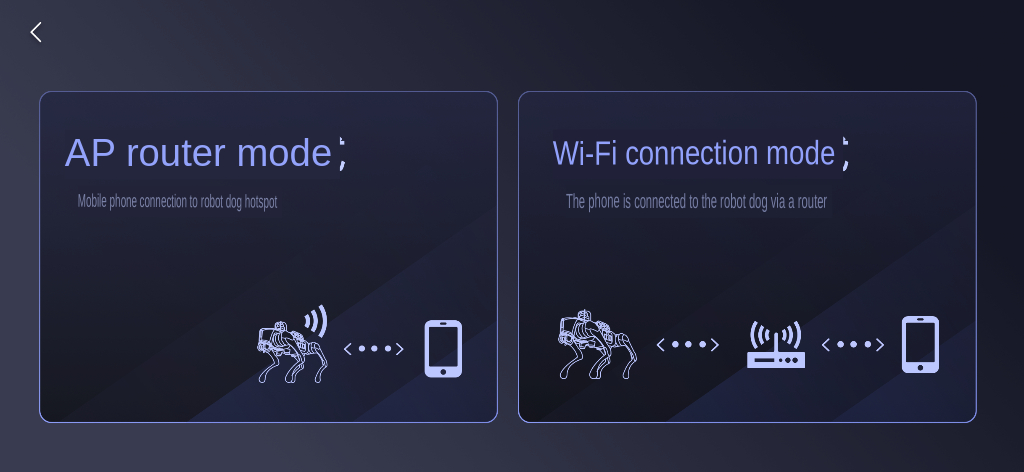
Go2 needs to establish a connection with the app. After binding the robot, you will have two connection modes: AP router and Wi-Fi. Choose the one that suits your needs.
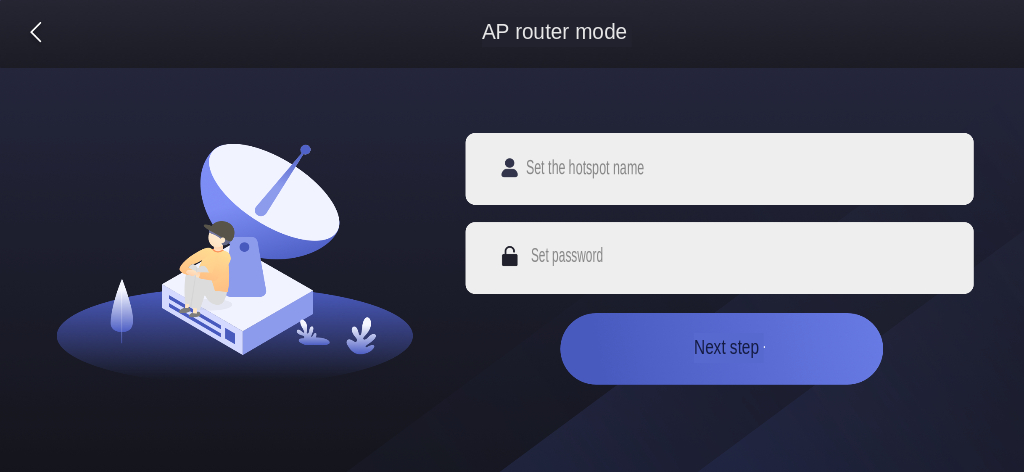
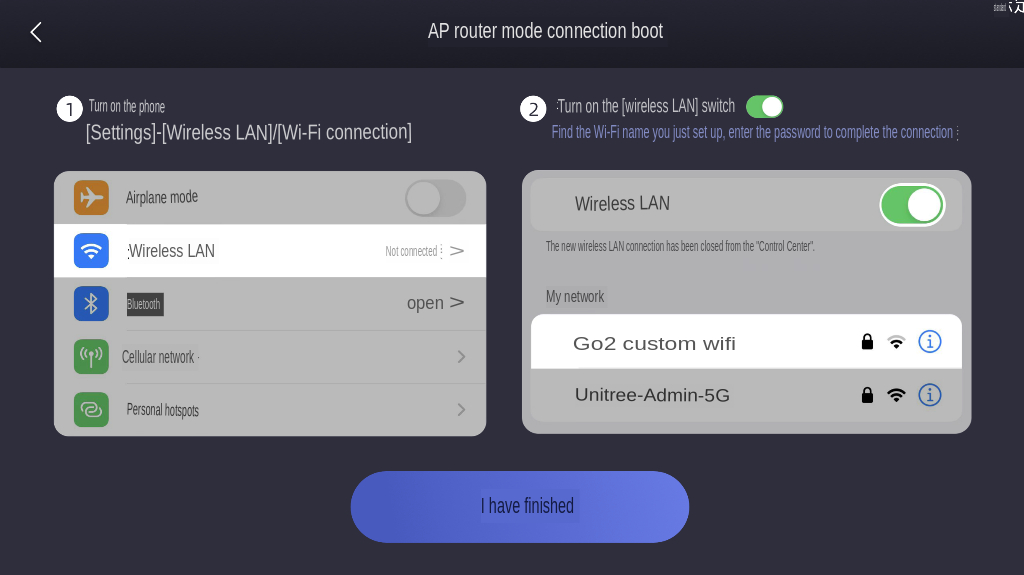
If you select AP Mode, follow the prompts to set the hotspot name (GO2-XXXXXX) and an 8-digit password. Open the wireless LAN settings on your mobile phone,select the Wi-Fi name you just configured, and enter the password to complete the connection. Once the connection is established, return to the Unitree Go App and click “I’m done” to confirm a successful connection between Go2 and the app.
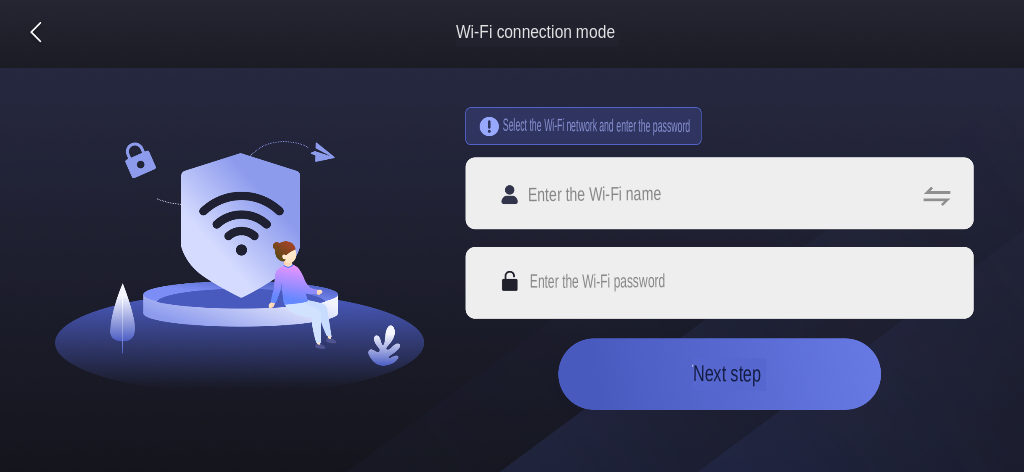
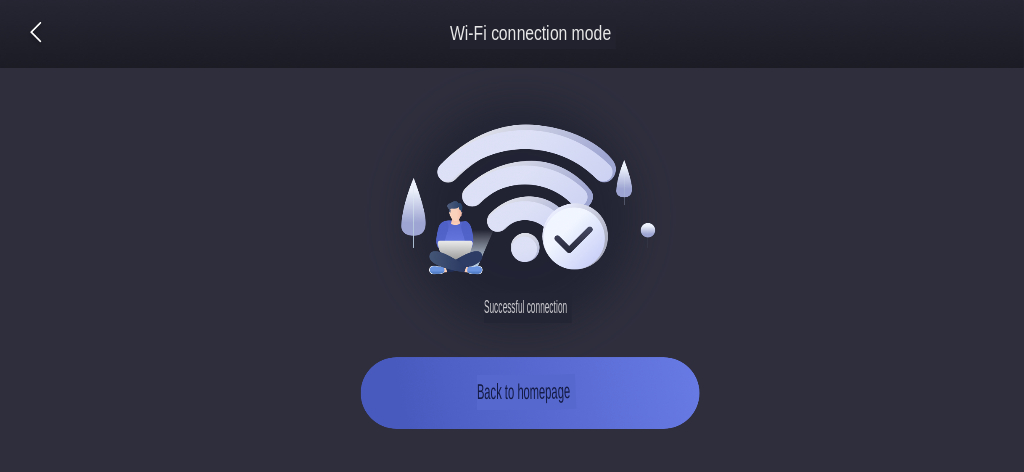
If you choose Wi-Fi connection mode, select this mode to establish a connection. Pick an existing Wi-Fi network and enter the password. Wait for the connection to be established. After the Wi-Fi connection is completed, return to the Unitree Go App’s home page, confirming that Go2 and the app are successfully connected.
You can access the App Binding video by following the provided link below.
Additionally, the following video demonstrates how to adjust the robot’s perspective view within the app after completing the setup.
Multiple Binding
To bind more then one Go2 with your app (considering you already have a Go2 binded with the app)please follow the below mentioned steps:
On the main screen please select the name of your robot mentioned on the top-left corner of the app.
select the plus sign besides the already binded robot.
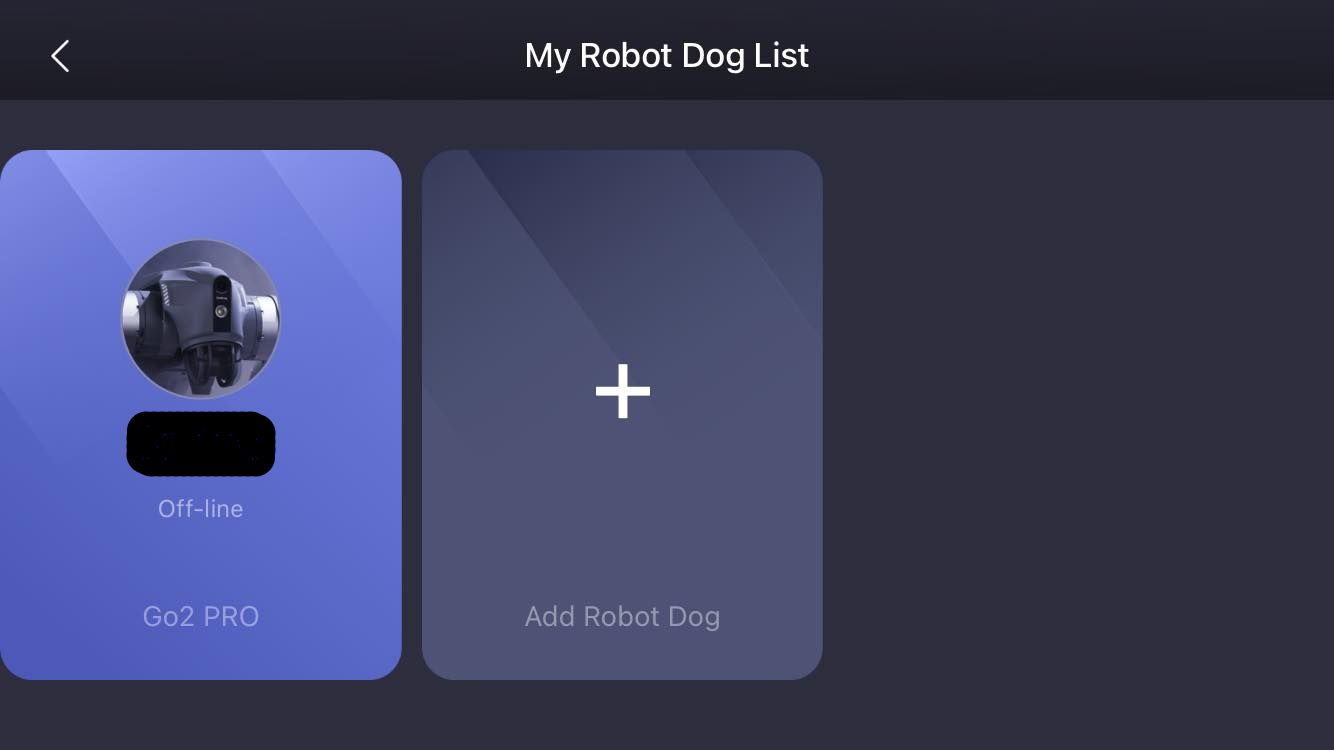
Now follow the same steps as mentioned in the above section to setup your additional Go2
Remote Control Binding
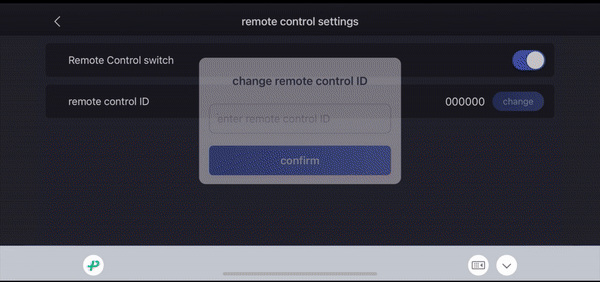
To pair a remote control with the Go2, follow these steps:
While the robot is powered on and connected to your mobile device, go to EMPLACE -> data -> Remote Control from the app’s home screen.

Choose change to modify the ID of the currently paired remote to match the new one you have.
Enter the 6-digit ID found on the white sticker on the right front side of the remote, then confirm to bind the remote controller.
For a visual guide on Remote Control Binding, access the video through the provided link below.
Basic Operations
Basic Movements |
Description |
Button Combination |
|---|---|---|
Head Up / Down |
Adjusts robot’s head pitch angle. |
Right Rocker (Push Forward / Backward) |
Turn Left / Right |
Turns robot’s head left or right. |
Right Rocker (Push Left / Right) |
Move Forward / Backward |
Moves robot forward or backward. |
Left Rocker (Push Forward / Backward) |
Sideways Movement |
Moves robot sideways left/right. |
Left Rocker (Push Left / Right) |
Searchlight Switch |

Toggles head searchlight ON/OFF. Default OFF. |
L2 (Click) + SELECT (Click) |
Obstacle Avoidance ON |
Enables obstacle avoidance. (Default ON) |
X (Click) |
Obstacle Avoidance OFF |
Disables obstacle avoidance. |
Y (Long Press for 3s) |
Mode Switches |
Description |
Button Combination |
|---|---|---|
Damping Mode (Emergency Stop) |
Immediately stops all robot motion. |
L2 (Long Press) + B (Click) |
Stand Lock / Low Down |
Locks current pose or robot goes into prone position. Press twice to return to standing. |
L2 (Long Press) + A (Click) |
Unlock / Default Gait |
Resets the robot to its default gait or unlocks it from a locked state. |
START |
Running |
Robot runs at higher speed. |
L2 (Long Press) + START (Click) |
Pose |
Makes the robot stand upright. |
SELECT |
Normal Gait |
Resets the robot to its standard walking gait. |
L1 (Long Press) + START (Click) |
Classic Gait |
Switches the robot to its classic gait style. |
RIGHT (Long Press) + START (Click) |
Free Walk |
Switches the robot to its free walk style. |
LEFT (Long Press) + START (Click) |
Free Avoid |
Enables free avoidance mode. |
A (Double Click) |
Cross Step |
Enables cross-step walking pattern. |
B (Double Click) |
Bound / Jump |
Enables jump or bound mode. |
X (Double Click) / Y (Double Click) |
Hand Stand / Erect |
Performs a handstand or erect pose. |
R1 (Double Click) / R2 (Double Click) |
Endurance Mode |
Enables long-duration, low-energy mode. |
L1 (Long Press) + SELECT (Click) |
Important
The AIR model currently does not support Free Avoid, Cross Step, Bound/Jump, Hand Stand/Erect.
Note
Please visit Unitree Go2 App to trigger more athletic modes!
Customised Movements |
Description |
Button Combination |
|---|---|---|
Stand Up from Fall |
Makes robot stand up after a fall. |
L2 (Long Press) + X (Click) |
Stretch |
Robot performs a stretching motion. |
R2 (Long Press) + A (Click) |
Shake Hands |
Robot performs a handshake gesture. |
R2 (Long Press) + B (Click) |
Love |
Robot shows a “love” gesture or pose. |
R2 (Long Press) + Y (Click) |
Greet |
Robot performs a greeting pose. |
L1 (Long Press) + A (Click) |
Jump Forward |
Robot jumps forward. |
R1 (Long Press) + A (Click) |
Sit Down |
Robot sits down. |
R1 (Long Press) + B (Click) |
Pounce |
Robot performs a pounce-like motion. |
R1 (Long Press) + X (Click) |
Dance 1 |
Robot performs first dance routine. |
L1 (Long Press) + B (Click) |
Dance 2 |
Robot performs second dance routine. |
L1 (Long Press) + X (Click) |
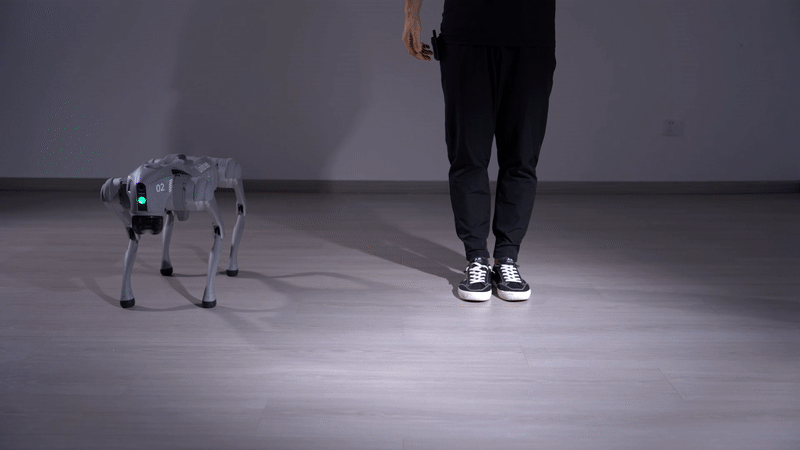
Accompany Mode
To activate the accompanying mode for the robot, you’ll need the small remote controller that’s included with it.
Quickly press the “M” button twice on the remote to enter accompanying mode while the robot is turned on. The front headlamp will turn purple, indicating the robot is in accompanying mode. In this mode, the robot will maintain a specific distance and angle from the remote transmitter as it moves.
To enable obstacle avoidance in accompanying mode, double-click the “L2” button on the remote.
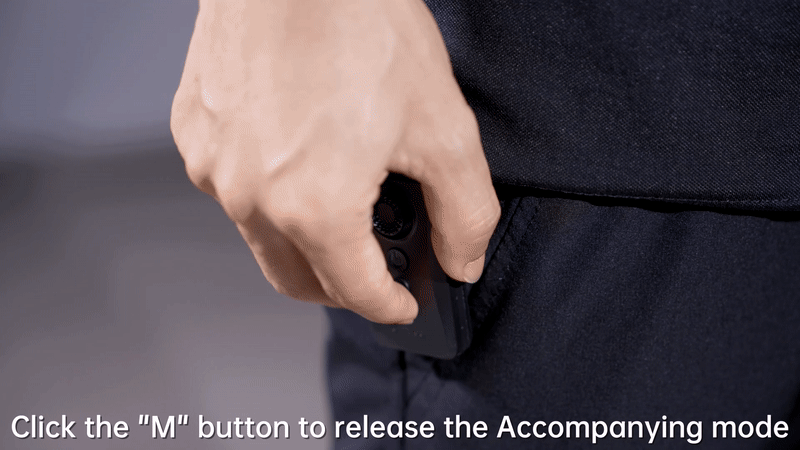
Press the “M” button once to exit accompanying mode.
For a visual guide on Accompany Mode, access the video through the provided link below.
Voice Command/ 4G Function
Navigate to FUNCTIONS -> BenBen Dog from the app home screen while the robot is turned on and connected to your mobile device. You’ll find the option to select either Automatic or LongPress. This choice determines whether the robot responds to voice commands instantly as you speak, or if you prefer to activate voice commands by pressing the talk button. This voice command feature allows complete control over the robot, from executing tricks, navigating specific distances and angles, to playing your preferred music.
For a visual guide on Voice commad Mode, access the video through the provided link below.
Note
To enable this Funtion, the robot requires an internet connection through Wi-Fi.
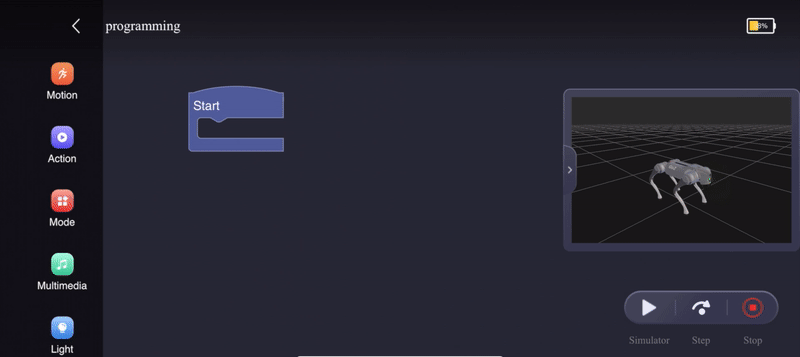
Programming Mode
Navigate to FUNCTIONS -> Programming from the app home screen while the robot is turned on and connected to your mobile device.

It will show you a UI with different commands blocks that you can mix and match for make your robot do certan stuff on the go. You can also visualize the simulation of your code in a small visual box on the right of the sceen.
For a visual guide on Programming Mode, access the video through the provided link below.
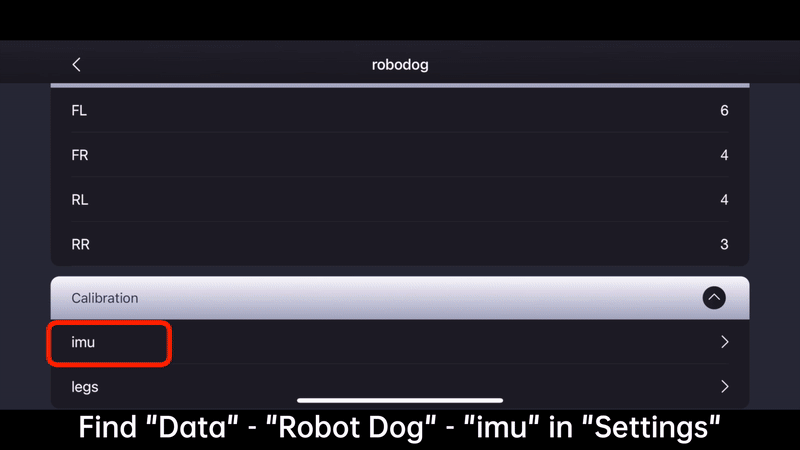
IMU Calibration
To calibrate the built-in IMU on the Go2, please follow these steps:
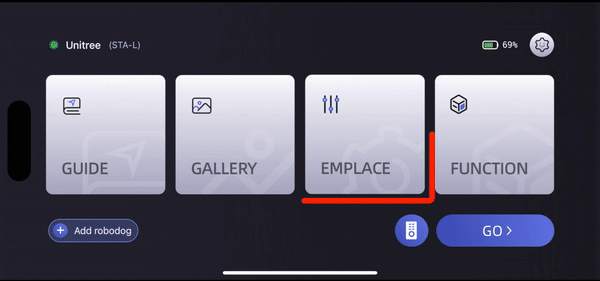
Navigate to EMPLACE -> data -> robodog from the app home screen while the robot is turned on and connected to your mobile device. Scroll down to the bottom and select the imu option.
The interface will prompt you to place the robot on an even and level surface, ensuring all four support pads are touching the ground.
Then, press the calibration start button. During calibration, the front headlamp will turn blue and start flashing. Once it turns green, the calibration is complete.
Restart the robot to save the calibration data.
For a visual guide on IMU Calibration, access the video through the provided link below.
Leg Calibration
To calibrate the legs on the Go2, please follow these steps:
Navigate to EMPLACE -> data -> robodog from the app home screen while the robot is turned on and connected to your mobile device. Scroll down to the bottom and select the legs option.

A popup will show up, select continue which will in return show you steps to take to calibrate the robot.
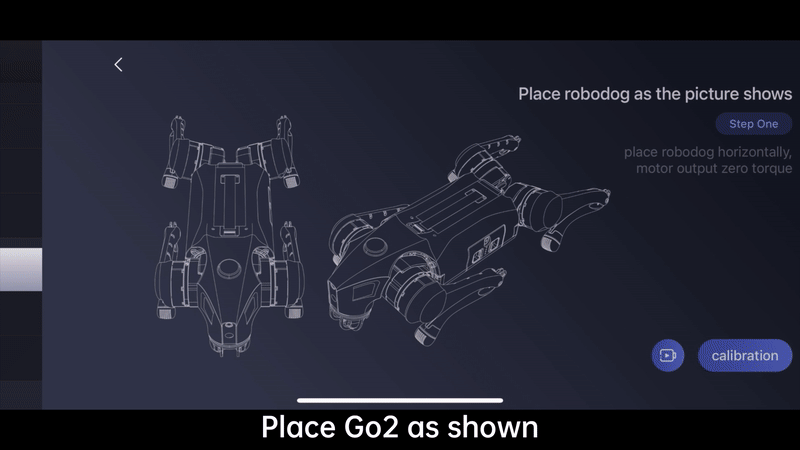
The interface will prompt you to place the robot on an even and level surface, ensuring all four support pads are touching the ground and select calibration option.

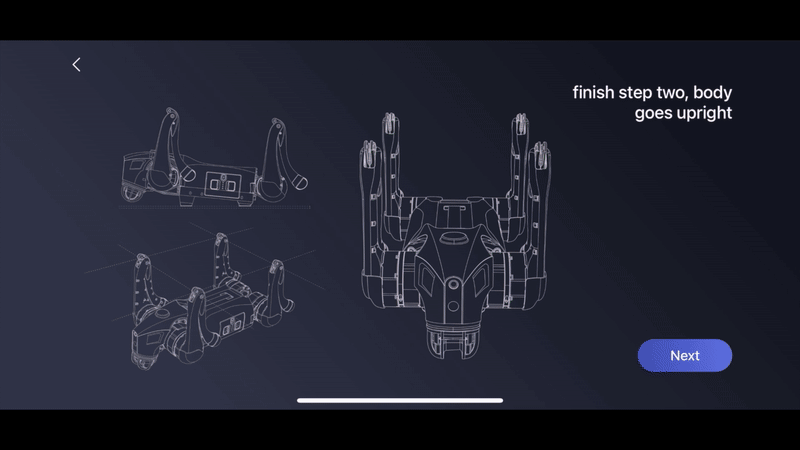
Align the body motor of the robot in a centered triangular shape as depicted in the images below. Then, press calibrate once more.
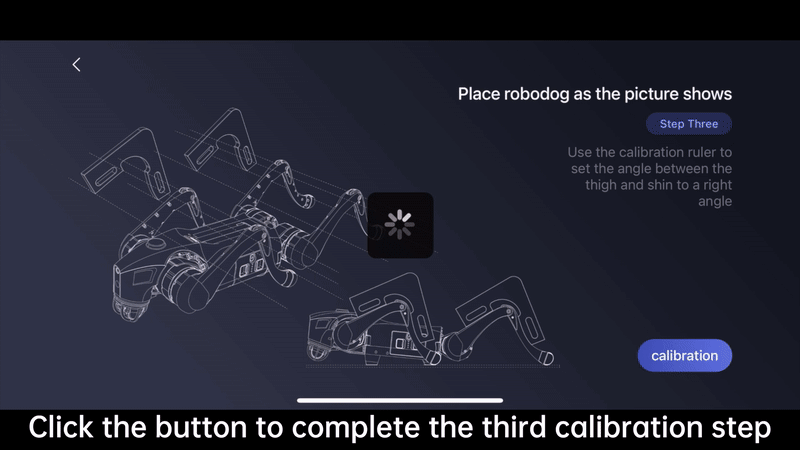
With the robot legs now in an upright position, utilize the calibration ruler to ensure the angle between the thigh and shin forms a right angle.
Press calibrate again and choose save to store the calibration data. Finally, restart the robot to confirm the calibration.
For a visual guide on leg Calibration, access the video through the provided link below.
Unbinding
To Unbind the robot please follow the below mentioned steps:
Login to your go2 app and from the main screen select option Device
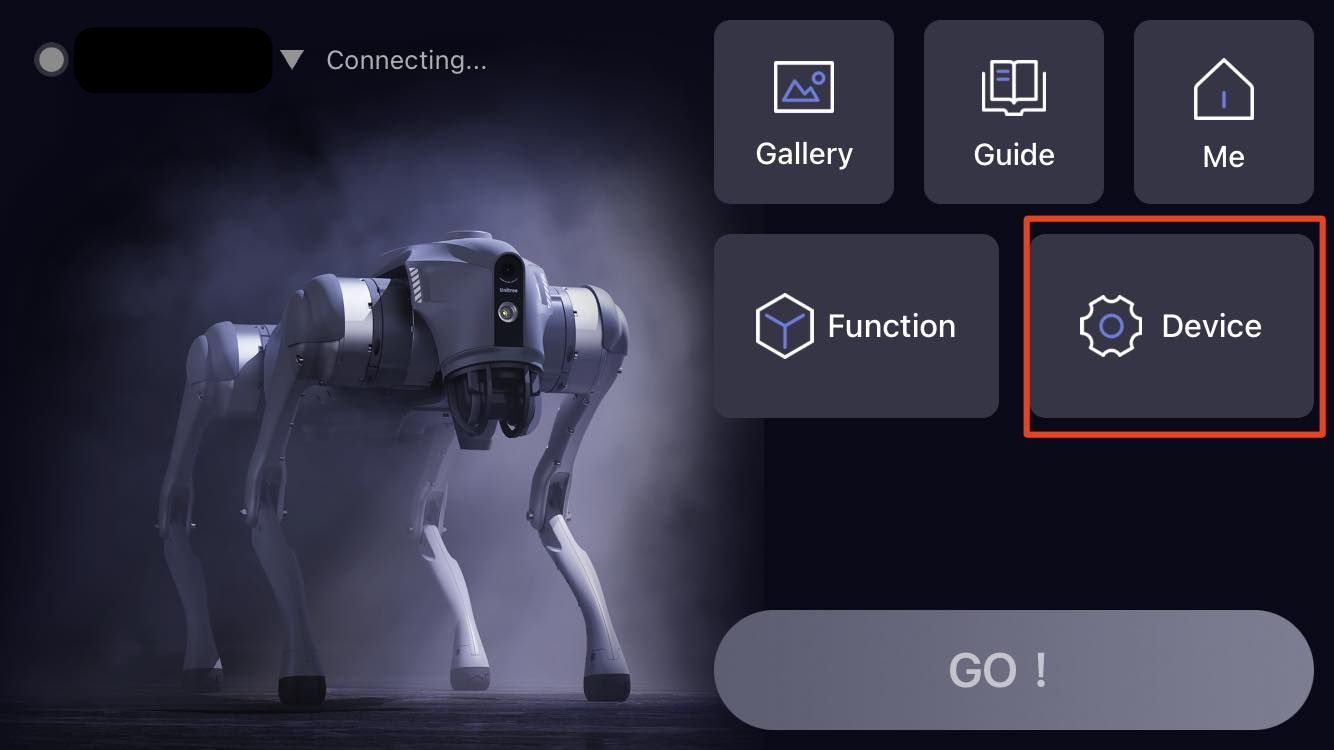
Select Robot Dog Settings option
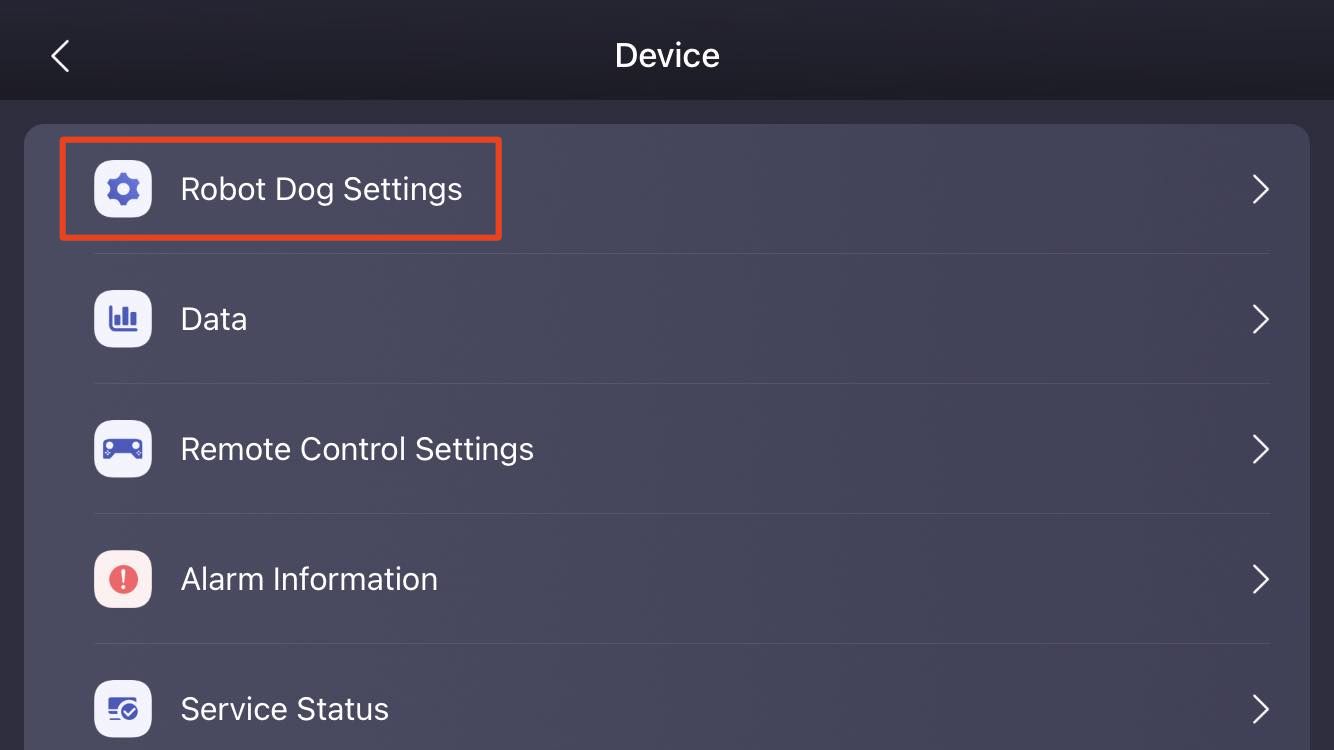
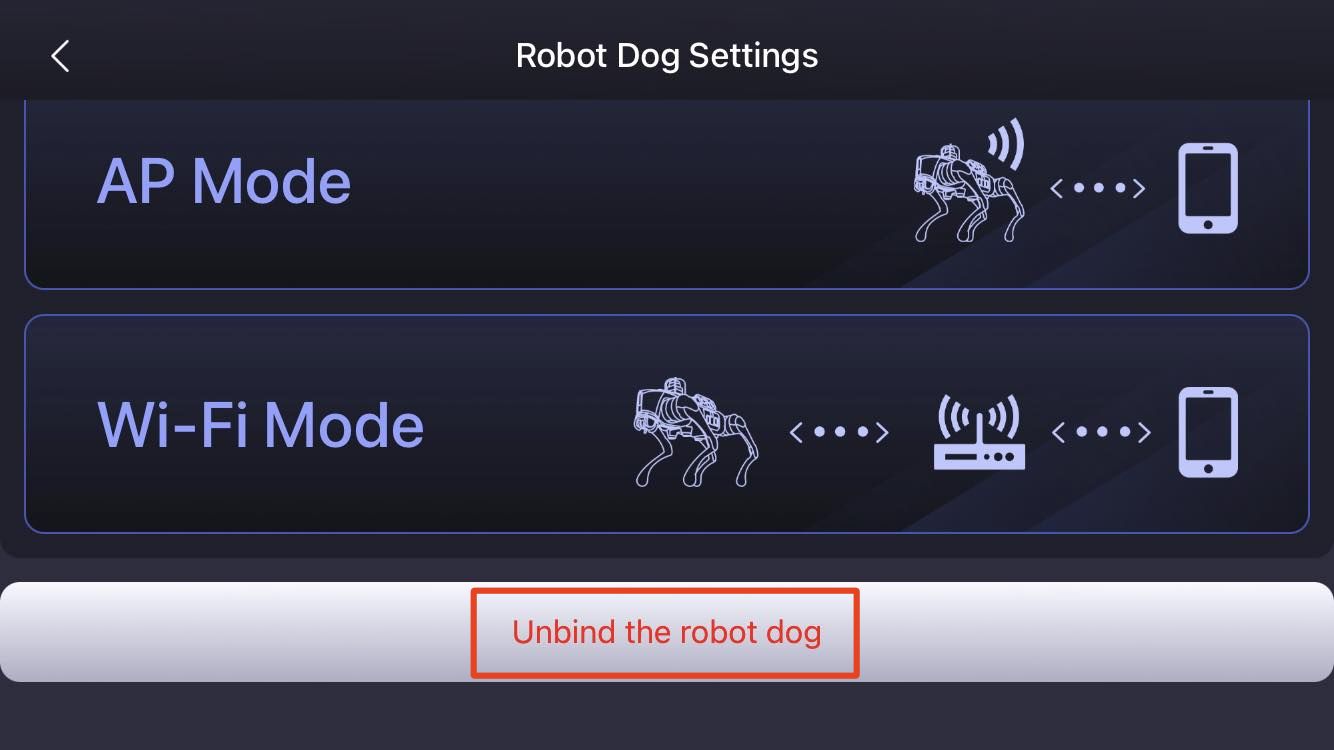
Scroll dow to the end of the page and select option unbind the robot dog
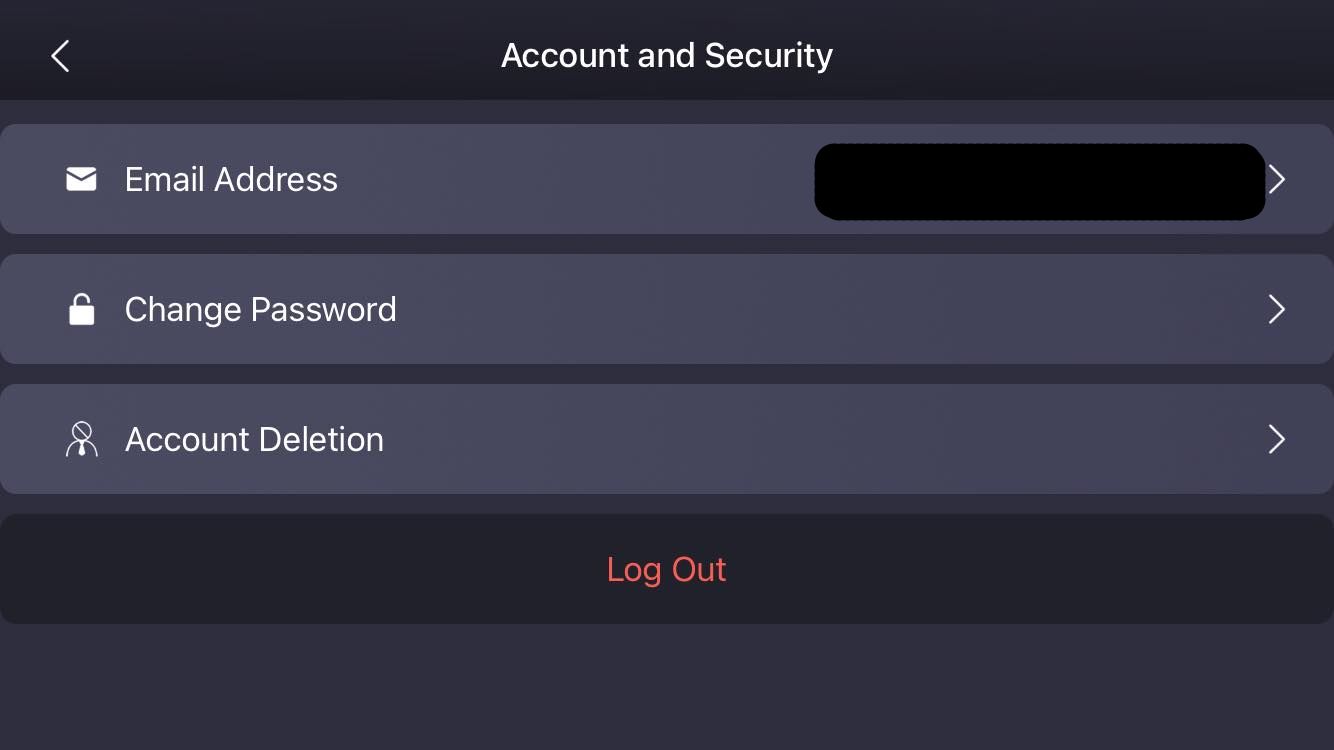
App Logout
To Logout of the unitree Go2 app please follow the below mentioned steps:
On the main screen select option Me
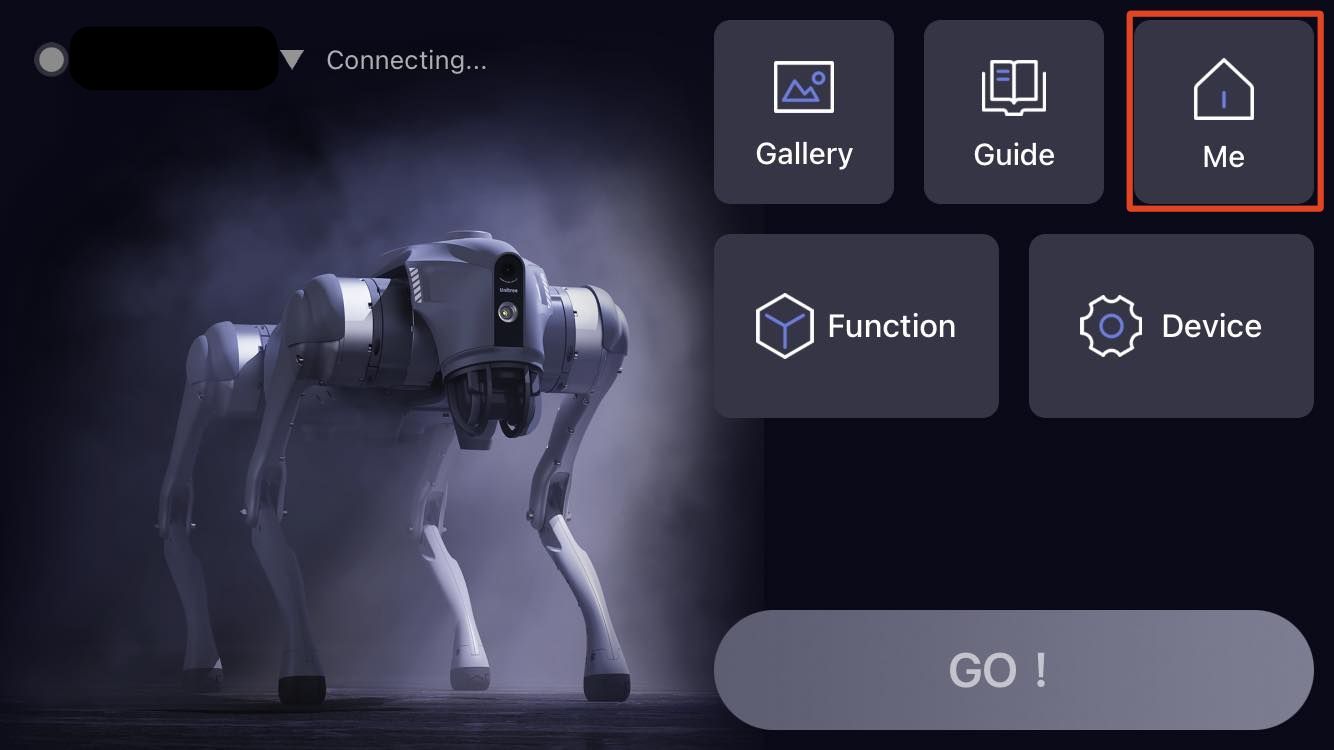
Select Account and Security option
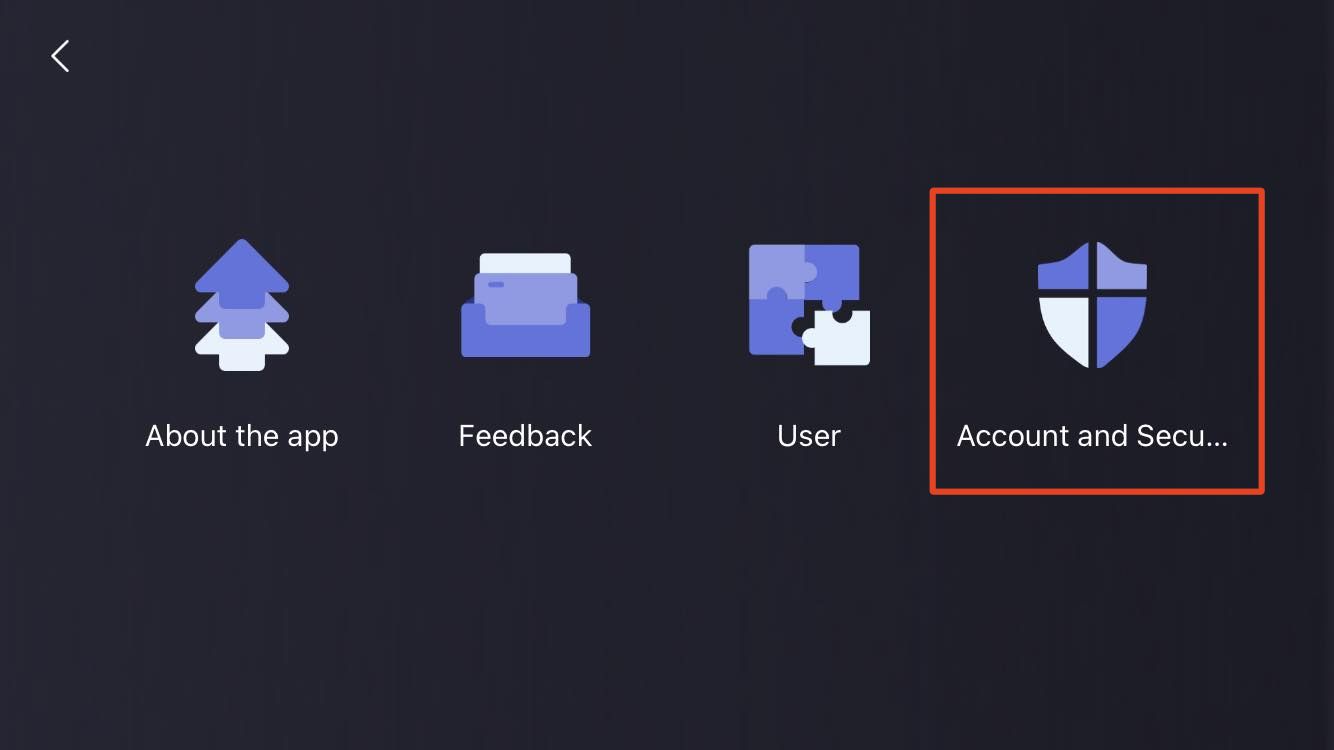
Scroll dow to the end of the page and select option logout
Lidar Assembly & Disassembly
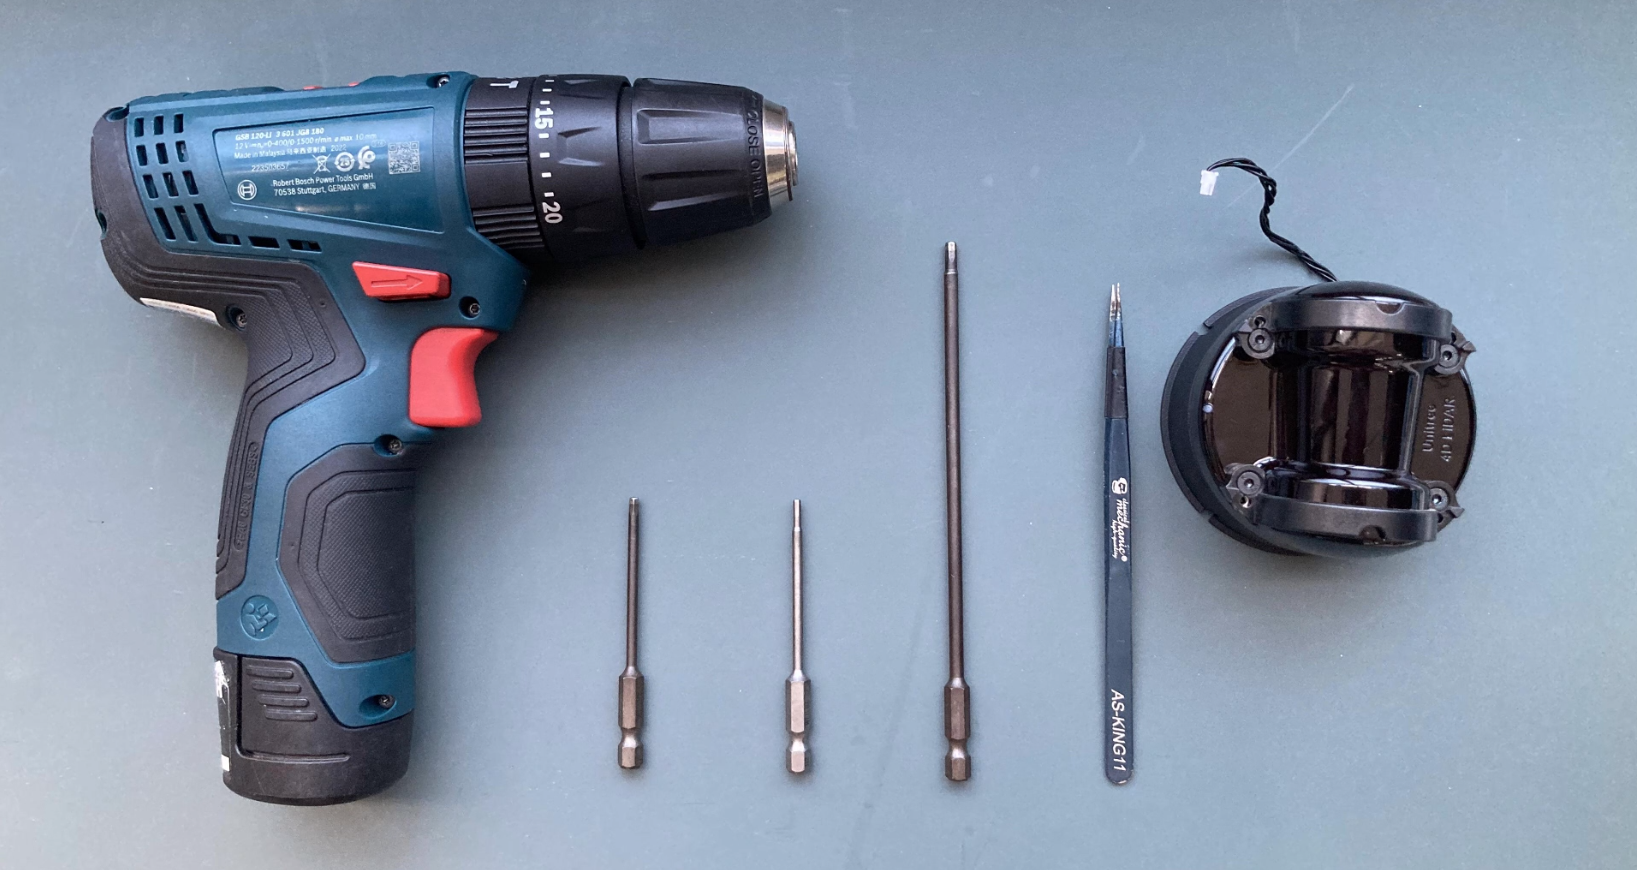
To assemble or diassemble the robot LIDAR manually please follow the video link provided below:
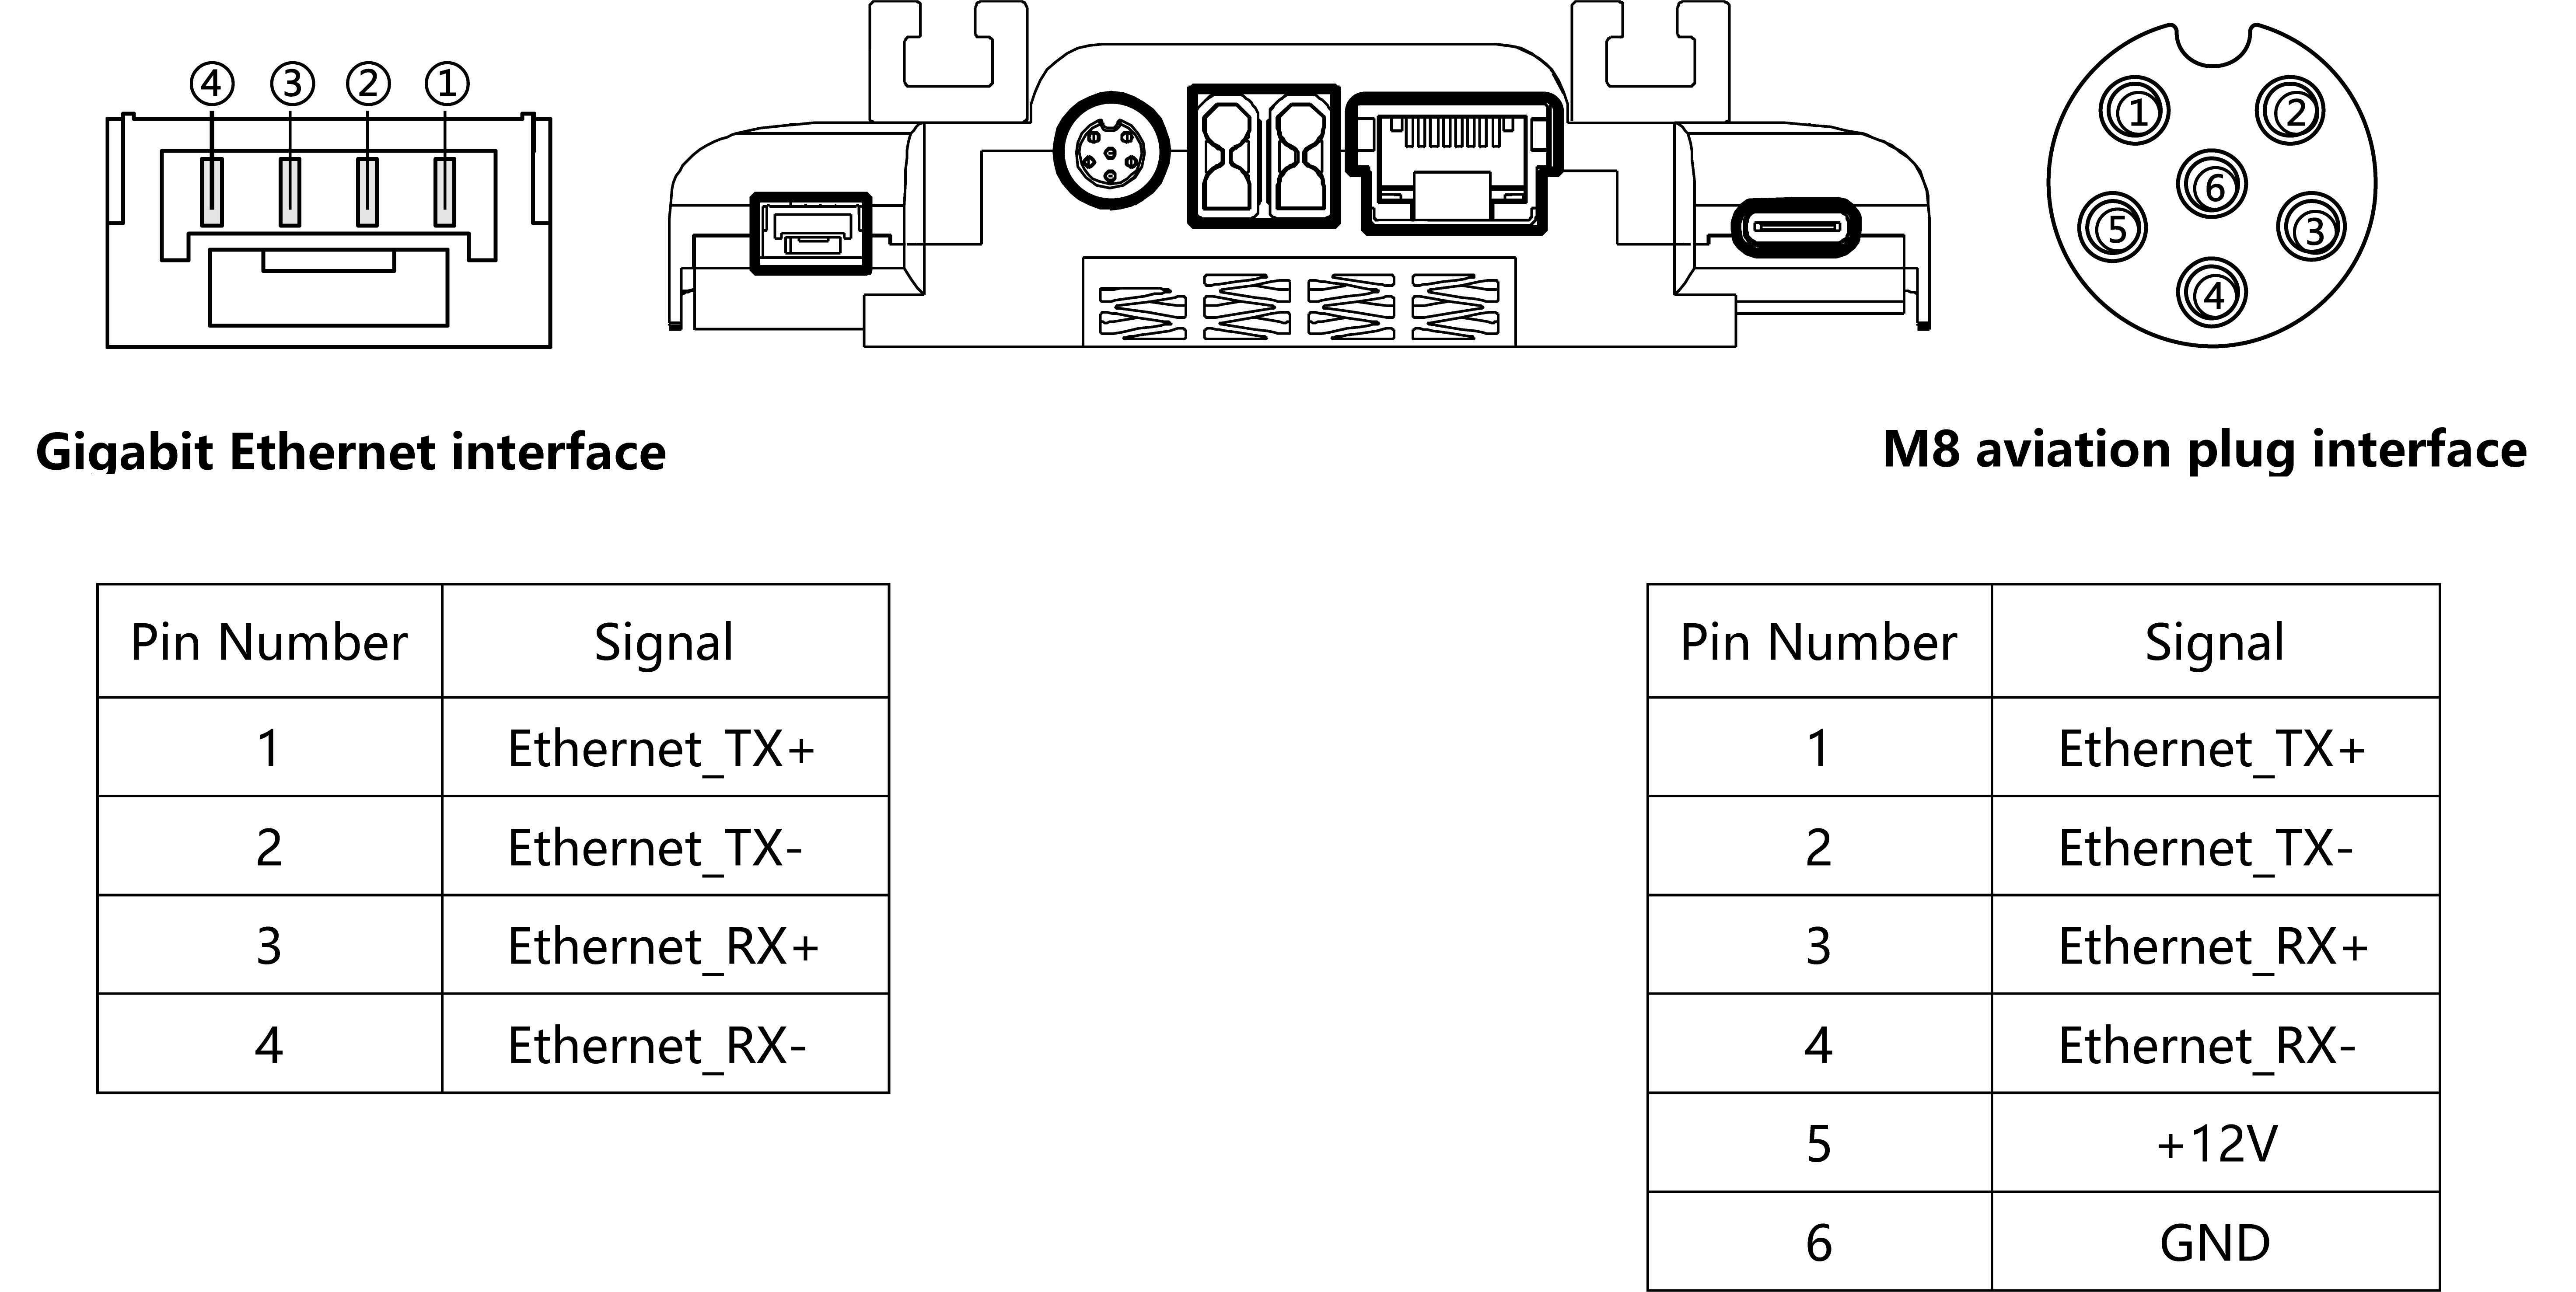
Electrical Interface

Interface |
Meaning |
|---|---|
XT30U-F Power Interface: |
|
Gigabit Ethernet Interface |
|
M8 Aviation Plug Interface (Gigabit Ethernet + 12V Power) |
|
USB-Type A Interface |
|
USB-DP Alt Mode Type-C Full-Featured Interface (USB+DP) |
|
USB-Type-C Interface |
|
GH1.25-4PIN Interface (Gigabit Ethernet) |
|
External Power-Supply
Warning
The procedure described below is only for development purposes. It turns on the robot without a battery inside from the external power supply. The power supply should atleast be able to provide 30V/20A.
Remove the battery from the GO2.
Ensure the GO2 is placed on the ground with all four paws as well as knee joints touching the ground.
It is advised to place robot on some carpet or similar compressible surface to prevent damage to the joints.
Connect the cable to the connection ports (XT30U-F BAT Input) on the GO2’s front .
The GO2 requires 30V with around 20A of current. At startup it may take up to 20-30A of current.
Be vigiliant and make sure the XT30 male pins are in the correct orientation when plugging in.

Steamdeck Controller
Warning
The Steamdeck usage is in experimental phase. Loss of connection or (laggy connection) may lead to the robot moving and/or not stopping immediately. Caution should be taken when using the Steamdeck for the operation of the robot!
Steamdeck - Basic Controls
Power button is on the top of the Steamdeck with the power symbol.
R2 for mouse left-click
L2 for mouse right-click
Left trackpad for mouse scrolling
Right trackpad for mouse movement
L2+R2 for middle mouse button click
The 3 dashes button is located on the top right of the Steamdeck next to the Y button, Hold for 3 seconds to gamepadmode and hold for 3 seconds again to go to desktop mode(Switching to desktop mode activates the cursor for the trackpad as well).
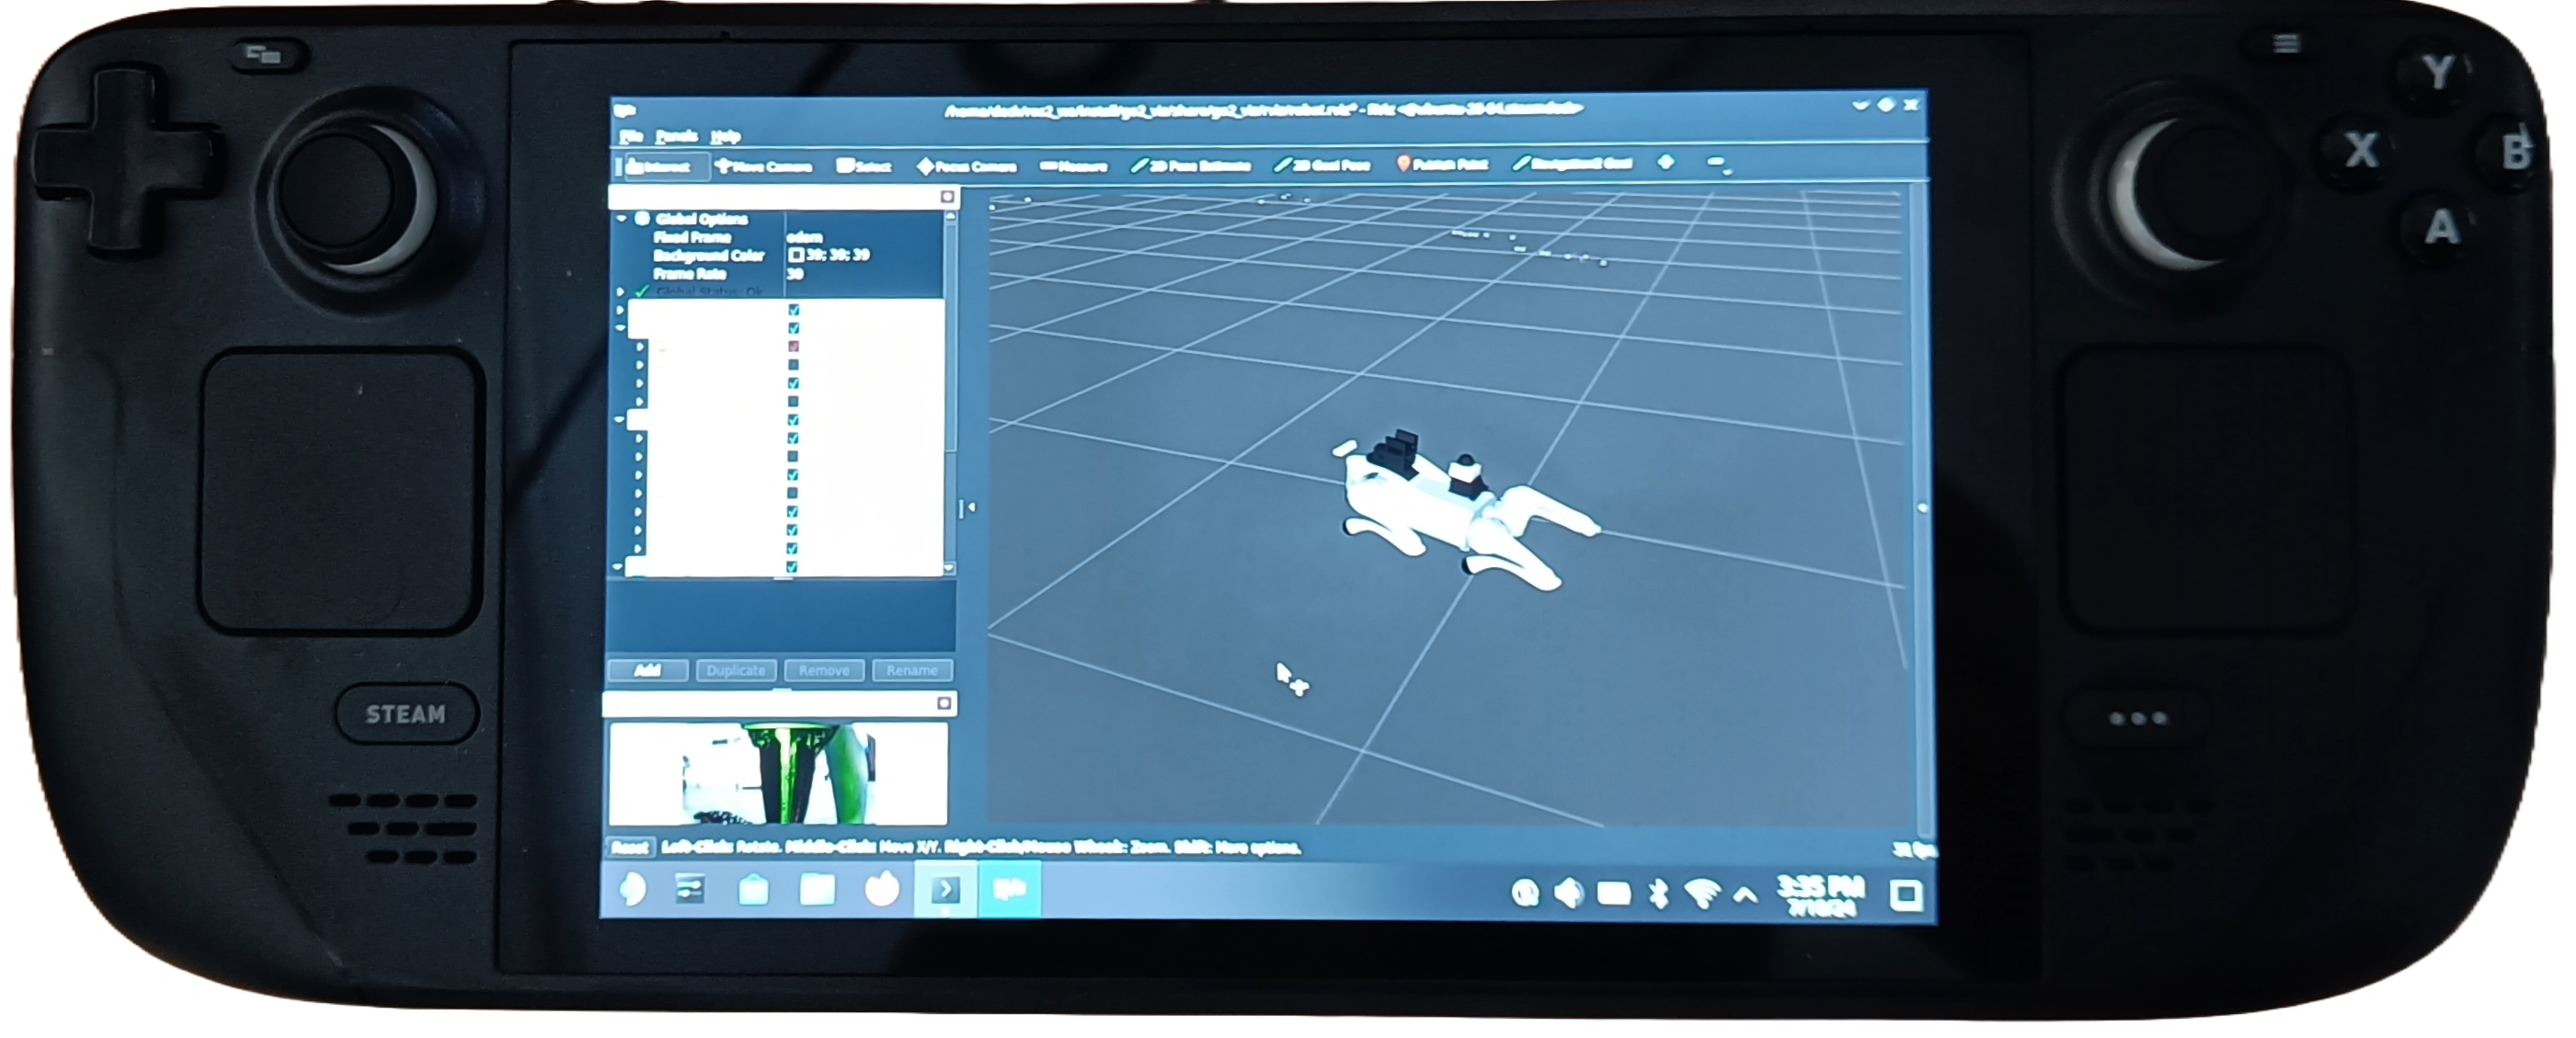
Steamdeck Controller
Steamdeck - Initialization with Robot
Before usage:
Ensure the Steamdeck is connected to the robot’s WiFi access point.
Ensure the robot is powered on and operational.
Single tap the Joystick Launcher on the screen to activate the controller for the robot. (Do not open multiple instances of the joystick launchers, as this can cause zombie nodes).
Single tap the Rviz2 Launcher on the screen to visualize the robot.
Steamdeck - Robot Controls
L1 is the dead man’s switch for slow speed.
R1 is the dead man’s switch for high speed.
LJ is to move in x and y direction.
RJ is to move in yaw direction.
B is to release soft switches if the lift reaches maximum height.
Steamdeck - Rviz2 Controls
L2+R2 should be held when wanting to move the orbit in the xy plane.
R2 should be held to orbit around the orbits origin
Left trackpad can be moved up and down to zoom in and zoom out.
Steamdeck - Connection
1. Please follow the instructions carefully above/ or with pictures in here to start the GO2 Steamdeck.
Connect to the custom router of the Go2, it may take a few minutes on startup of the robot.
The IP of the steamdeck is 192.168.123.150
The IP of the router is 192.168.123.100
The IP of the Unitree Go2 is 192.168.123.18
Once the joystick is opened hold L1 and use the left and right joystick to move the robot.
You can change to different movement styles (gaits) for the go2 via the web browser as mentioned below in the console tab.
The web browser will automatically open and take you to https://192.168.123.18:9000.
The drivers on GO2 are off by default. You can click on restart all to start all ROS2 services enabling control via the steamdeck+ros2.
The console menu can be used to change between the different gaits. Additionally, more services can be added in /opt/mybotshop/src/mybotshop/go2_webserver/go2_webserver/libroscustom.py